While some people loathe home improvement projects, I live for them. One major task I encountered was removing carpet and padding about 30-plus years old—a dust mite’s dream and an allergy sufferer’s worst nightmare. I gained many insights from pulling up the carpet, so here are some useful tips for navigating the process.
First, make things easier on yourself by removing everything from the room: furniture, decor, your cat, everything before starting the project. Once you have cleared the space, do yourself another huge favor and vacuum the space to reduce the dust, debris, dry mold, and those microscopic creepy crawlers that might start flying once you get to pulling.
HOW TO DIY
Now, for Pulling Up the Carpet.
You have vacuumed or have not—no problem. Choose your adventure! Either way, you are ready to begin. I will stress that it is crucial not to jump to these steps before putting on protective gear.
Suggested tools: protective gear (heavy gloves, a mask, eye protection, thick-soled shoes, knee pads), measuring tape, spray paint, needle-nose pliers, a utility knife, and a sharp-bladed floor scraper.
Not required: duct tape (I did not use it).
1
Simplify carpet removal by measuring 3.5 ft strips across the room and then marking the spot with spray paint. These dimensions allow easy cutting and rolling, making disposal a breeze.
2
Safely use a utility knife to cut into the carpeting—remember to make manageable strips and be mindful of the room’s length.
3
Seize the carpet corner and yank it outward using needle-nose pliers.
4
Recutting the carpeting is necessary if it does not roll up smoothly. Use duct tape to keep the carpet rolls from unraveling.
6
Use the sharp-bladed floor scraper to remove as many carpet staples as possible. If any staples remain, use needle-nose pliers to remove them.
Dive deep into the intricacy of carpet removal.
Below, you will find comprehensive step-by-step instructions and insights to ensure your DIY journey is successful and easy.
1
Measure 3.5 ft Strips
To simplify carpet removal, measure and mark 3.5-ft strips across the room with spray paint. Marking these dimensions allows easy cutting and rolling, making disposal a breeze because carpeting could become too heavy to manage safely.
One thing to consider is how expensive removing carpeting might be—my estimate was over $1,000! You can hire a junk removal service or pay for additional trash pickup from your garbage disposal provider. However, the carpet pieces cut into 3.5-ft strips can easily fit into your trash can for weekly trash pickup at no extra cost—unless you want to tip your garbage person! Adding the carpet strips to your trash bin is ideal for any carpeting that cannot be recycled or upcycled.

2
Cut the Carpeting
Instead of waiting until all the carpet is pulled up from the room and then cutting it (work smarter, not harder), cut the carpet into more manageable strips before you pull. Since rolled-up carpeting can become heavier and more difficult to remove later, it is easier to cut it up as you go in larger rooms. You might find this step therapeutic because how often do you get to destroy something on purpose‽
3
Detach the Carpet from the Tack Strip
Go to your favorite corner, grab the carpet with pliers, and pull away! If the rug is easy to remove, keep going. If you struggle to remove the carpet from the tack strip, use your utility knife to cut out a small square by the corner. Remove the piece, then pull up the rest of the carpet.
Watch Outs
If you encounter a metal transition strip under the carpet that separates it from other flooring or carpeting, cut the carpet but leave the transition alone. Additionally, for closets, always cut the carpet by the closet door and separate that piece.
After all the carpet is up, you will notice narrow strips of wood or other materials, usually around the room’s perimeter. These carpet tack strips keep the carpet in place and ensure a tight, wrinkle-free fit. Reinstalling new carpeting can be more cost-effective if you leave the carpet tack strips in place. You can take them out if you are considering wood flooring! As seen in this quick ASMR carpet tack strip removal video, you can remove the tack strips by sliding a pry bar under them.
4
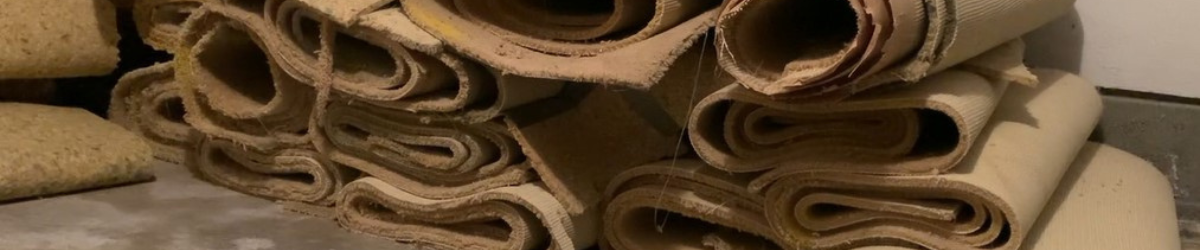
Roll Up the Carpet Strips
This step is self-explanatory. Take the pieces and roll them up. Some people even recommend using duct tape to secure the rolls after you finish. That’s up to you. I just rolled the carpet up, piled the pieces in my garage, and tossed them in my garbage bin every week.
As I undertook the arduous task of removing over 2,000 square feet of carpeting, it became clear that every DIY project requires careful planning. To make things more interesting, I unintentionally invited rodent residents to nest in the carpet I stored in my garage. So, here’s a quirky tip: think ahead before you gleefully toss that carpet into the trash, particularly when removing the carpeting, should you dispose of it with your garbage.
5
Remove the Carpet Padding
Once the carpet is removed, the padding underneath should be exposed. You shouldn’t need to cut into the padding if your utility knife is sharp enough to pierce the carpeting. Pull up and remove the padding precisely as you did with the carpet strips—the padding is typically held in place with staples. The material is not bulky, so it’s easier to handle. Duct tape the roll of padding if you feel it is necessary.
6
Remove Any Remaining Staples
The method for removing the chunks of carpet padding and staples left behind will vary depending on the type of flooring you are working with. Hardwood floors require you to remove any remaining staples with your chosen tools. A sharp-bladed floor scraper should do the job when dealing with a concrete floor or regular wood subfloors. I used this sharp-bladed floor scraper on the subflooring. It was so fun to use, saving me hours of work.
7
Clean the Floor
Once you have hauled the carpet and padding, sweep or vacuum to remove debris or dust. This cleaning will make things easier and prepare the space for the installation of your new carpet or flooring.
8
Dispose of the Carpet + Padding
Investigate recycling options to guarantee your carpet is not chilling in a landfill for decades. Start by contacting local waste management companies or calling your city’s information line.
I stacked all the carpeting into my garage, thinking I would toss a few rolls each week with my regular trash. Smart, right? Until one day, I heard rustling and met the tiny genius you see in the corner of the graphic. He turned the carpet pile into a cozy winter condo.
Eventually, I called 1-800-GOT-JUNK to evict the mess. Don’t worry! I humanely trapped the Einstein mouse and released him into the wild. And no, there’s no footage. I thought I hit record.

🗑 Disposal Options
- Toss the 3.5 ft carpet strips into your trash bin for weekly pickup.
- Coordinate trash pickup removal from your local waste management provider.
- Contact a junk hauling service for hassle-free removal.
- Investigate recycling options in your area.
- Use the Carpet Collector Finder at Carpet America Recovery Effort.
- You can upcycle the carpeting to create floor mats, furniture movers, dog house liners, and anything else you can imagine.
Removing old carpets can be daunting. However, with the right tools and careful planning, it is a DIY project that can save you a significant amount of money. Following the steps outlined above can make the process more manageable. Remember to prioritize safety by wearing protective gear and taking your time to ensure a clean and smooth floor for your future home renovation projects.
About esseio.
Providing clear-cut instructions for your home renovation project because transforming your living space should be simple, pleasing, and worry-free.


Leave a Reply