Whether your current tank is acting up, is cracked, or you need to remove floral wallpaper behind the egregious, water-wasteful 1990s tank [ deep sigh ], knowing how to remove a toilet tank skillfully is a trick worth having up your sleeve. So, grab your tools, and let’s get started.
A PLAYFUL PLUNGE
Conquer the Commode
Begin with these high-level instructions to grasp the process, then prepare for detailed tips and insights to elevate your DIY skills to new heights. Whether you are a seasoned DIYer or a curious newcomer, the content style ensures that you will not only succeed in removing your toilet tank but also understand the hows and whys of each step.
Removing the toilet tank requires an adjustable wrench, Vise-Grip, sponge or old towels, and a bucket.
Not required: a turkey baster (yes, I am serious!).
1
Locate the water supply line at the base of the toilet tank and turn off the water supply to the toilet by rotating the coupling nut counterclockwise.
2
Hold down on the flush level to drain the tank entirely. If you do not properly shut off the water supply, it will fill with water again.
3
Water might be at the bottom of your toilet tank; scoop it with a cup, siphon it with a turkey baster, or soak it up with a sponge or cleaning cloth so it does not drip onto the floor when you remove the toilet tank.
4
Drop an old towel or place a bucket underneath the toilet tank to catch spills, especially when removing the supply hose.
5
Unscrew the supply hose from the bottom of the tank. Use a wrench or Vise-Grip to get a firmer grip.
6
With a screwdriver, loosen the bolts inside the tank by turning them counterclockwise. You can find the position of the bolts by looking under the toilet tank; there are usually 2-3 bolts securing it to the bowl.
⚠ Important Note
There are two types of toilets: one-piece and two-piece. The two-piece tank is the only toilet tank that can be removed and put back together.
When I first decided to remove the floral wallpaper behind my toilet, I had no plumbing knowledge, and perhaps I still don’t. So, trust me when I say if I can do this, so can you. The following section dives deeper into the nitty-gritty details of toilet tank removal, offering you the guidance I wish I had from the start. For example, keep all the toilet tank components so you won’t have to pour a bucket of water into the bowl every few weeks to prevent sewer odors from escaping, all because you are too stubborn to purchase replacement parts.
Hi hi! 👋 Are you not sure what you’re getting yourself into? This YouTube Short gives you a fast-forward peek at the entire process before I outline the detailed steps below. 👀Watch it here →
1
Shut off the Water Supply
First, find the water supply line snuggled at the base of the toilet tank and give that coupling nut a counterclockwise twist to shut off the water.
2
Drain the Tank
Next, hold down the flush lever like you mean it to drain the tank completely. But beware! If you haven’t shut off the water supply properly, the tank will start to refill, mocking your efforts.
3
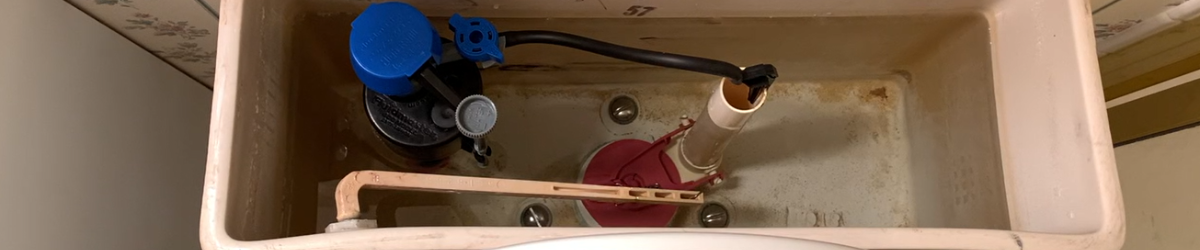
Remove the Remaining Water
With the tank mostly drained, you’re now faced with a critical decision: how to tackle that stubborn bit of water still lingering at the bottom. Will you:
A
Grab a trusty cup
because every problem-solver knows that the simplest tools are sometimes the most effective.
B
Reach for a turkey baster
and channel your inner kitchen ninja, expertly siphoning the water with precision and flair.
C
Opt for a sponge
embracing the slow and steady approach as you soak up every last drop with the patience of a Yogi.
Cup
Choose a smaller, flexible cup that is easy to hold in one hand. A disposable plastic cup or a small, sturdy kitchen cup works perfectly. Once your cup is in hand, carefully position it at the bottom of the tank and scoop out the water. With each scoop, pour the water directly into the toilet bowl or flush valve opening, ensuring that you remove as much water as possible.
❌ Cons
Inefficient. There will inevitably be a small amount of water left at the bottom of the tank because the cup’s edges cannot wholly conform to the flat surface of the tank’s bottom. Although this remaining water is minimal, it is something to be aware of, as you may need to use a sponge or cloth to soak up the last bit to prevent spills when removing the tank.
Turkey Baster
Using a turkey baster to remove water from a toilet tank may seem unconventional, but it’s surprisingly effective. Unlike a cup, which can leave behind residual water, a turkey baster allows you to siphon out even the shallowest pools of water precisely. Its narrow tip can reach into tight corners and crevices, ensuring the tank is as dry as possible. The ASMR sounds of using a turkey baster to siphon water from a toilet tank are oddly satisfying—and maybe even hilarious.
❌ Cons
Tedious. Because the baster only holds a small amount of water, you’ll need to repeat the siphoning action multiple times to remove all the water. Even though the water in the tank is technically clean, it’s hard to shake the mental image of using the same turkey baster destined to baste your Thanksgiving turkey to fix a toilet tank. The association between bathroom repairs and your holiday dinner prep might make this method feel a bit off-putting, even if it’s effective.
Sponge
Using a sponge to remove water from the bottom of a toilet tank is highly effective because it can absorb and soak up every last bit of water. The sponge conforms to the shape of the tank’s bottom, reaching into corners and crevices where water tends to linger. This method guarantees that the tank is thoroughly dried, reducing the risk of spills when it is removed. Plus, a sponge is easy to control and maneuver, making it a reliable option for a clean and efficient job.
❌ Cons
Time-Consuming. It can be messy, as you will need to wring it out frequently, which can lead to drips and spills if you are not careful or zone out. It may take several passes to absorb all the water, making the process longer than other methods. While it effectively drains the tank, the potential for a little mess and the need for repeated wringing are the main drawbacks.
4
Prepare for Spills
Place an old towel or bucket underneath the toilet tank to catch any spills, especially when removing the supply hose. Even if you’ve diligently removed as much water as possible, some drips will still escape. So, plop something down to absorb the mess.
5
Disconnect the Supply Hose
Unscrew the supply hose from the bottom of the tank using a wrench or Vise-Grip for a firmer grip. If you do not own a Vise-Grip, now is your chance to buy one. It will help with toilet tank removal, home improvement projects, and opening stubborn pickle jars—a game changer!
6
Loosen the Bolts
Use a screwdriver to loosen the bolts inside the tank by turning them counterclockwise. The bolts are located under the toilet tank, where 2-3 bolts usually secure it to the bowl.
When you loosen the bolts inside the tank, you might find that a worn-down bolt head makes it difficult to grip. Here are a few steps you can take to fix the issue:
- Use a Penetrating Oil: Apply a penetrating oil, such as WD-40, to the bolt and let it sit for 10-15 minutes to help loosen any rust or corrosion that may be contributing to the difficulty.
- Cut a New Slot: Use a compact hacksaw to cut a new slot into the bolt head carefully. Once the slot is deep enough, use a flathead screwdriver to turn the bolt.
- Drill It Out: If the bolt is too damaged to remove with any other method, you can drill it out as a last resort. Use a metal drill bit slightly smaller than the bolt and drill straight into the center of the bolt until it can be removed.
7
Remove the Tank
The average toilet tank weighs between 25 and 50 pounds, depending on the size, material, and whether it contains any remaining water. Porcelain tanks on standard toilets typically fall within this range, making them manageable for most people to lift.
The Secret to Lifting the Tank
The movement of lifting a toilet tank is quite similar to a deadlift, particularly a sumo deadlift. Need a primer on a sumo deadlift?
Both the sumo deadlift and lifting a toilet tank involve using your legs to do the heavy lifting while keeping your back straight to avoid strain. By thinking of the lift as a sumo deadlift, you can use proper body mechanics to safely lift the toilet tank without risking injury.
DON’T 👏 LIFT 👏 WITH 👏YOUR 👏 BACK 👏
Congratulations! Whether your goal was to access that hidden wallpaper, paint behind the tank, make repairs, or explore the inner workings of your bathroom, you now have the know-how to handle it. I will never forget the eureka moment when I poured a bucket of water into the toilet bowl, and it flushed, even with the tank removed. Indoor plumbing is genuinely fantastic! So, hopefully, you have one of those moments in your home improvement journey.
Flush those doubts away.
Read the FAQs for toilet tanks that were not included in the article.
Why remove a toilet tank?
A few reasons to remove a toilet tank include leaks, repairing mechanisms like the flush valve gasket, float cup, or fill valve, or if the tank has cracked. Other, simpler reasons include cleaning or remodeling areas around the bathroom where the tank might be in the way.
How often should I replace my toilet tank?
The average lifespan of a toilet is 10–15 years, but it can last longer if it’s well-maintained. Some experts say that toilets should be replaced every 25 years due to damage and inefficiencies. Toilets used less frequently, like those in guest bathrooms, may last longer than those in more regularly used bathrooms.
Is it possible to remove a toilet tank without disconnecting the fill valve?
Yes, you can remove a toilet tank without disconnecting the fill valve, but you must empty the tank first.
Can I remove a toilet tank without turning off the water supply?
To avoid a mess, you should turn off the water supply to your toilet before removing the tank. However, older shutoff valves may not work correctly or completely shut off the water. If this happens, you may need to turn off the main water supply valve for your entire house.
Can I use a different type of toilet tank on my existing bowl?
Yes, it is possible to use a different toilet tank on an existing bowl if the tank and bowl fit together perfectly. Check with the manufacturer to double-check compatibility.
How long does it take to remove a toilet tank?
On average, removing a toilet tank can take between 30 minutes and a few hours, depending on the type of toilet and the specific reason for the removal—whether it’s for repairs, replacement, or simply to clean or remodel the area around the tank.


Leave a Reply