NEVER once thought of cleaning the inside of my clothes dryer. Removing lint from the lint trap was enough. Wrong. I was standing in the primary bedroom when I smelled something so offensive and so… concerning… that my brain immediately went: fire.
Of course, it had to happen while I was drying some delicates. Why not almost lose your house and your dignity in one go? (Spoiler: singed undies do not come out fresh, no matter how many times you rewash them.)
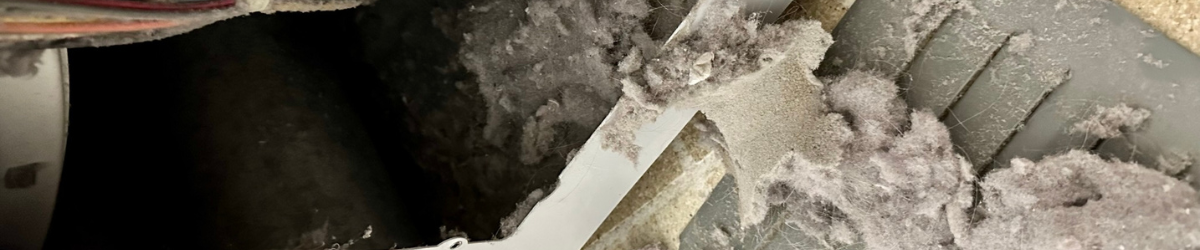
A cracked internal pipe inside the dryer allowed lint to accumulate to a depth of three to four inches within the machine. It was a perfect little campfire waiting to happen. So, whether you’re here as a reminder to clean or because your dryer emits a terrifying smell, I’m walking you through how to safely pop off the back of your dryer and clean it out step by step. It’s not hard, it doesn’t take long, and it might save your house.
Let’s get into it.
LINT HAPPENS
Toast Your Bread, Not Your Briefs.
Start with these Step-by-step instructions to keep your dryer hot (but not that hot!!). Grasp the process, then use detailed tips and insights to elevate your DIY knowledge. Cleaning the interior of your dryer is a crucial maintenance task that helps prevent fire hazards caused by lint buildup.
Removing the back of the dryer requires a Vacuum cleaner with a hose attachment, a Dryer vent cleaning brush or kit, Microfiber clothes, Work gloves (the insides are pretty sharp), and a Flashlight.
Not required: telescoping inspection mirror.
Safety First
Unplug Your Dryer! 🚨
Ensure the dryer is disconnected from the power source to prevent electrical hazards. For gas dryers, shut off the gas supply to avoid leaks.
An important note…
This blog post does not include instructions for fixing a broken vent pipe or repairing fire damage. It is more of a “spring cleaning meets fire prevention” guide.
After disassembling, cleaning, and carefully reassembling my clothes dryer, I sat next to it in that “Did I do this right?” phase. I waited. I sniffed. Unfortunately, the sounds and smells told me everything I needed to know. The fire had already done its damage, and the dryer itself wasn’t safe to keep [sad trombone].
01
Identify the screws securing the back panel. These are typically located along the edges. Using the appropriate screwdriver, remove all screws and set them aside.
02
Pull the dryer’s back panel off. If it resists, check for any remaining screws or clips that might still be holding it in place.
03
Inspect the interior: With the back panel removed, you can access the dryer’s internal components, including the drum, motor, and venting system. From here, you’ll see whether it’s just a quick cleanup or if, like mine, there’s a crack or break in the venting system that needs attention.
04
To clean the interior, vacuum up lint and debris: Using the vacuum cleaner or shop vac with a hose attachment, remove all visible lint and debris from the interior. Pay close attention to areas around the motor and venting system. This is where the telescoping inspection mirror comes in handy.
05
Insert the dryer vent cleaning brush into the venting pathways to dislodge and remove any hidden lint buildup. Vacuum again.
06
Dampen a microfiber cloth with soapy water and wipe down the interior surfaces to remove any remaining dust or residue. Check that all components are dry before reassembly!
07
Reattach the Back Panel. Hopefully, you remembered where you safely kept your screws
08
Plug the dryer back into the power outlet. For gas dryers, turn the gas supply back on.
09
Test the Dryer by running a short drying cycle to guarantee that it operates correctly and that there are no unusual noises, smells, or issues.

Cleaning Your Clothes Dryer
What started as a weird smell turned into a full-blown clean-out mission, and I’m glad I tackled it head-on. The following section explains the process of safely opening and cleaning your dryer with ease. I’ve included the details I wish I had upfront, like why it’s worth checking every corner before you close things up again.
Trust me, it feels good to know exactly what’s happening behind the scenes of your laundry routine. And it is even better when your dryer isn’t one cycle away from spontaneous combustion.
Have you checked the instruction manual?
Before getting started, it’s a good idea to reference the instruction manual for your specific dryer model to ensure there aren’t any quirks or hidden parts that could cause damage (or drama) during disassembly.
So, you’ve checked the dryer. It is disconnected from the power source to prevent any electrical hazards. You have carefully removed the dryer from the wall to access the back panel, confirming you went slowly to avoid yanking the vent hose or scratching your floor. Cool. Cool.
1
Remove All Screws
Most back panels are held in place by Phillips-head screws around the outer edge, although some models may require a nut driver (usually 1/4″ or 5/16″). Skip any center screws! They often contain internal parts that don’t need to be removed. As you remove the screws, keep them in a small cup or stick them to painter’s tape so they don’t vanish mid-project.
2
Pull the Dryer’s Back Panel Off
If the panel doesn’t budge, don’t force it. Some dryers require the top panel to be removed or slid back first to release the back. And one last thing: dryer guts can have some sharp metal edges, so gloves aren’t a bad idea, especially if you’re reaching deep inside.
3
Inspect the Interior
With the back panel removed, you now have full access to your dryer’s inner world—the drum cavity, motor housing, blower assembly, and the start of the venting system. This is where you trade guesswork for actual answers.
Take a moment to look around with a flashlight and your inspection mirror. You’re checking for anything suspicious.
If you’re lucky, it’s just a dusty mess, and a simple cleaning will do the trick.

4
Vacuum Up Lint and Debris
Start by using your vacuum cleaner or shop vac with a hose attachment to remove all visible lint, dust, and debris from inside the dryer cabinet. If your vacuum has a narrow crevice tool or angled nozzle, even better. Work slowly and methodically around the interior, especially in tight corners.
Pay special attention to the area around the motor, belt, and any exposed wiring, but don’t touch anything electrical or dislodge any connections. These parts are lint magnets. Even a thin blanket of lint can restrict airflow or pose a fire hazard over time.
You’ll also want to check around the venting system. This is where your dryer connects to the ductwork. If your lint trap is front-loading, debris often gets sucked down into the housing below it. Tilt your hose in and let the suction do its thing.
Here’s where the telescoping inspection mirror becomes an MVP. Use it to peek into hidden spots behind structural panels, beneath the drum cavity, or around the blower wheel housing. If you see lint tucked in tight crevices, gently coax it out with a soft brush (or the telescoping mirror 😳), then vacuum again.
Helpful tip: A bright headlamp can help you spot lint clumps that your regular overhead lighting might miss.
This is one of those steps where being slow and deliberate pays off. Think of it as giving your dryer a deep-tissue massage—you’re not cleaning for looks, you’re improving efficiency and safety.
5
Brush Out the Venting Pathways: The Satisfying Part
With the visible lint vacuumed up, it’s time to go deeper—literally. Grab your dryer vent cleaning brush, which is the long, flexible one designed to snake through the twists and turns of your dryer’s internal airways.
Start by inserting the brush gently into the venting pathways inside the dryer cavity. Depending on your model, this could include:
- The lint trap housing (especially if the trap loads from the top or front),
- The blower wheel area, and
- The internal vent chute that leads to your external ductwork.
Slowly push the brush in and twist as you go. You should feel some resistance against the compacted lint buildup clinging to the sides. Keep turning and pulling the brush back out. It’s normal (and very satisfying) to see tufts of lint sticking to the bristles like cotton candy.
Repeat this process several times until the brush comes out clean!
Once you’ve brushed everything loose, vacuum the area thoroughly again, as lint will now be scattered inside the cabinet and around the duct openings. Use your crevice tool and inspection mirror again if needed.
Warning: If the brush gets stuck, don’t force it. Back it out gently and adjust the angle. Some dryer ducts have sharp turns or narrowed spots. Let the tool work with the appliance, not against it.
Taking the time to complete this step properly can restore your dryer’s airflow and even reduce dry times.
6
Wipe Down Interior Surfaces
Dampen a microfiber cloth with warm, soapy water and wipe down all accessible interior surfaces, including metal panels, plastic parts, and around the lint trap. This removes any lingering dust or residue that the vacuum may have missed.
Rinse and re-wipe as needed, then thoroughly dry everything with a clean, dry cloth to ensure no moisture is left behind. All components must be dry before reassembly to prevent rust or lint clumping.
This step is quick and gives your dryer a clean slate before reassembling it.
7
Reattach the Back Panel
Line up the back panel and secure it with the screws—hopefully the ones you set aside in that very safe, super memorable spot. A magnetic screwdriver can make this step easier if the screw holes are recessed. Don’t overtighten—snug is enough. You’ll thank yourself next time you clean it out.
8
Restore Power
Once everything is clean, dry, and reassembled, it’s time to bring your dryer back to life.
Plug the dryer back into the power outlet. Ensure the cord is fully seated and not twisted or pinched behind the machine, as this helps prevent wear over time.
If you have a gas dryer, carefully turn the gas supply valve back on by rotating it counterclockwise until it’s fully open. You should not hear or smell anything unusual. If you do, stop immediately and consult a professional.
This is a great time to do a quick visual check: Is the dryer level? Are the vent hose and connections secure? Is the area around it clear of dust or dirty clothes?
9
Test the Dryer
With power and gas restored, it’s time for the moment of truth: run a short drying cycle on low heat.
Listen closely for any unusual sounds—clicking, scraping, or anything that wasn’t there before. Watch for error codes, flashing lights, or odd vibrations. And, pay attention to the smell. You’re sniffing for anything beyond the faint scent of warm dust. If you notice a burning smell, shut it off immediately.
I actually sat next to the dryer during this test run, legs crossed on the floor, flashlight in hand, ready to shut it off at the first sign of smoke. Unfortunately, the damage was too far gone. So, if your dryer still isn’t running after all this effort, don’t beat yourself up.
And that’s it!
With my dryer officially out of commission, I had no choice but to hang-dry all my laundry. But, since my HOA doesn’t allow clotheslines, I resorted to draping clothes across every available surface inside the house. What I didn’t realize at the time was that air-drying clothes indoors can increase humidity, which may have contributed to the spread of the black mold that eventually infested the laundry room.
For nearly a year, I made do with stiff, crunchy towels and fuzz-covered shirts that no amount of lint rolling could completely fix. It was frustrating, funny in hindsight, and a smell I will never forget. Laundry became less of a routine and more of a puzzle. And somehow, that made the eventual repair (and this blog post) feel even more satisfying.
I hope this post helped you feel a little more confident tackling your own dryer cleanup. I’ll be adding a video to my ASMR YouTube channel soon, so if you like seeing the behind-the-scenes chaos, keep an eye out for it!
About esseio.
Sharing straightforward steps for your home renovation and maintenance projects. I’m someone who had to learn the ropes when my house fell apart around me, figuring things out and fixing my fixes along the way.


Leave a Reply